Our daughter-in-law, Nicole, is having some electrical renovations done to her home. I am intrigued by one of her projects; she is adding lighting to an area with a flat ceiling and no attic access. Understanding the construction of a home or building will go a long way in answering how to start and complete a remodel without unnecessary repair costs and causing major damage to the existing structure.
To install luminaires in an existing home, the electrician must know the differences between a rafter, a joist and a truss. All three are structural elements in a building. Rafters support a roof structure, trusses provide support for a roof or floor, and joists provide support for floors and ceilings.
Generally, rafters and trusses are used for roof framing and may be installed flat or sloped. Rafters are usually individual wood members constructed on site, often 2 inches by 6 inches or 2 inches by 8 inches or larger (commonly called a 2-by-6 or 2-by-8). They extend from the ridge or peak of the roof to the building’s exterior support walls. The size of the rafter will depend on the length of the span between the peak and the support walls. They do not typically have space above for any type of attic.
Trusses are prebuilt, preengineered and can usually span greater distances and support heavier loads than rafters. Trusses and their slope will depend on what type of roof load will occur over the year. Trusses are usually faster and easier to install than rafters since trusses are preengineered and delivered to the job site during initial construction. Using trusses usually means there is space for an attic area or a place to install wiring.
Joists are horizontal structural members used to support floor decking and ceilings. Joists are not preengineered. They are constructed at the job site and do not usually provide space above for wiring. Joists also may require drilling for the wiring.
Be very careful about drilling holes or notching rafters, trusses or joists, since these holes may weaken the structure when improperly done. Preengineered trusses, especially, are designed for specific load-bearing capacity and should never be drilled or notched without professional guidance by a structural engineer or the truss manufacturer.
Building codes may also provide specific restrictions on hole placement, hole size and spacing for rafters and joists. Drilling in the wrong location may result in a sagging roof or weak floor. One rule is to drill the hole in a position away from the ends or edges of the structural member and in the top portion of the rafter or joist. Avoid drilling within 2 inches of the joist edge and preferably somewhere close to the center of the joist.
Limit the size of the hole to not more than one-third of the depth of the rafter or joist and don’t drill near any support flanges. Do not drill multiple holes in the same rafter or joist without proper spacing. In addition, drill a starter hole using a smaller drill bit and then progress to a larger bit to prevent damaging the joist or rafter. Using a large bit without the pilot hole could shatter the wood, resulting in a substantially weakened structure.
Knowledge is power
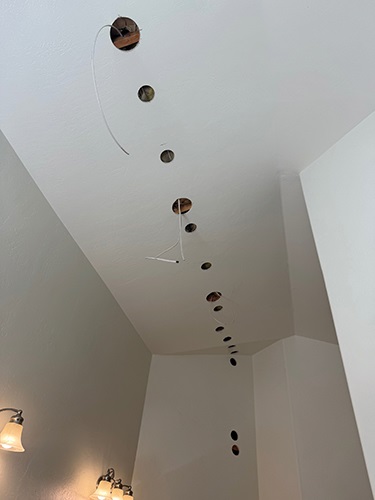
Understanding the building structure can also be extremely advantageous when adding to a lighting or receptacle circuit or making a new circuit in an existing home. The electrical contractor who did the additional lighting in my daughter-in-law’s home had an interesting method. Using a hole saw, he drilled round holes between each joist space, drilled a small hole in each joist and then used a fish tape with pull string to connect each round shallow box with the NM cable.
He then drilled two round holes in the drywall—one in the ceiling and the other in the wall—to allow him to connect the ceiling luminaires to a wall switch. He installed a switch at 42 inches above the finished floor by cutting a box into the wall. This switch box was located directly above an existing receptacle. (A second option would have been to do the installation described in the next paragraph.) He installed NM cable from the switch up to the ceiling area and then into the various ceiling-mounted round boxes, replaced the round drywall cuts (probably with a small piece of wood to span across the drywall hole) and then repaired the drywall.
Depending on how the flat roof joists or rafters were installed in the existing structure, he could have drilled a hole in the fascia on the outside of the roof using UF cable (underground feeder and branch circuit cable) and chased into each ceiling void to the holes for the luminaires.
A weatherproof box at each fascia hole on the outside with EMT between each box could be installed without damaging the ceiling drywall at all. Innovative methods can be used for retrofitting lighting in an existing home.
mark c. ode
About The Author

ODE is a retired lead engineering instructor at Underwriters Laboratories and is owner of Southwest Electrical Training and Consulting. Contact him at 919.949.2576 and [email protected].