Last month, I covered a few spreadsheet basics. This month, let’s see what we can do with a spreadsheet, a few formulas and some formatting.
Spreadsheets have many formatting tools, which enable you to recreate almost any paper form you use. Drawing lines, assigning colors to text and backgrounds, adjusting column widths and changing fonts are just a few of the formatting abilities spreadsheets offer.
Why would I turn a paper form into a spreadsheet? Four reasons come to mind immediately. The first is office supplies. By eliminating paper, I save money on pencils, erasers and forms. The second is corrections. If you type something wrong into your spreadsheet, you can simply edit the entry or retype it. No more erasing over and over until there is a hole in your paper. The third reason is organization. The spreadsheet’s ability to cut, copy, paste and insert information makes it easy to get your data in order without erasing or rewriting. The fourth reason is automation. Because a spreadsheet can be set up to do all the math in your form, you should never again need your calculator.
This month, I create a simple takeoff sheet. If you have a spreadsheet program, work along with me. My examples are based on Excel 2016.
First, let’s become familiar with the layout of Excel’s screen. Across the top is the ribbon, which is made up of two parts: A row of labels, such as file, home, insert, etc., and a row of icons that represent various commands and functions. The icons will change depending on which label you select. The one exception is the file label, which takes you to a different screen for saving, opening and printing spreadsheets. The Home ribbon contains most of the functions you need to create and use many spreadsheets.
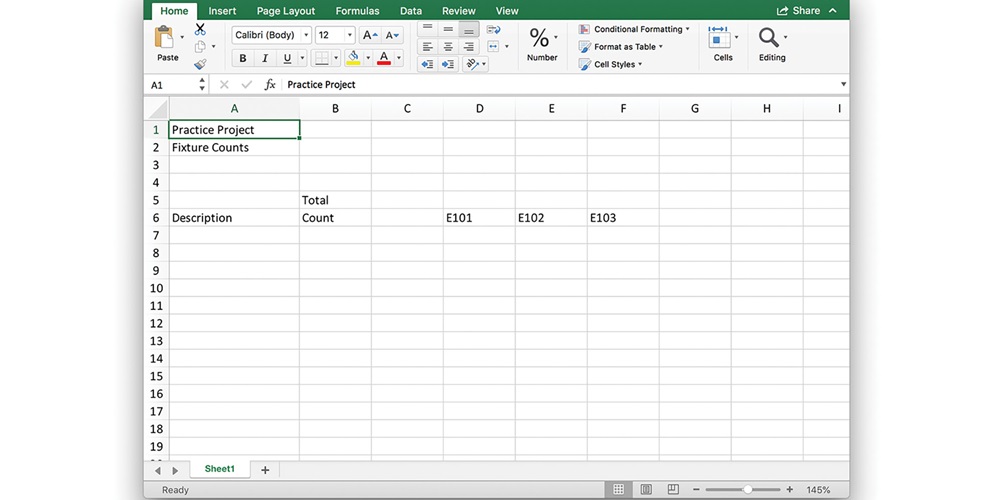
I usually start a new spreadsheet by putting in some text. In the case of a takeoff sheet, you will need text for the project name, takeoff type, material descriptions and plan sheets. This is just one of several ways to layout a takeoff sheet.
Left click one time in cell A1 in your spreadsheet. Now your cursor is in the active cell, and any text, numbers, and the results of formulas you type will appear in the active cell.
Let’s start by typing a job name, such as “Practice Project,” in cell A1. When you are done typing, tap the enter key, tap an arrow key, or click another cell with your mouse to make your entry. In cell A2, type something describing the takeoff, like “Fixture Counts.” In cell A6, type the word “Description.” In cell B5, type “Total”, and in B6, type “Count.” You can start putting labels for your plan sheets in cell D6 and continue to the right, such as E101 in D6, E102 in E6 and E103 in F6.
If you make a mistake, there are at least three ways to correct your work. Left click in the cell that needs changes, and then press the “F2” key, which will put the program in edit mode so you can make changes. You can also double-click in the cell to put it in edit mode, or you can simply point to a cell and type over the existing contents.
Now is a good time to save your work. Click on the file label to see your options for saving a file. Click on “Save,” and since it’s the first time saving the file, the program will prompt you to pick a location to save your file and give the file a name.
When you create a new spreadsheet, all of the columns are the same width. You might have noticed that some of the text we put in column A doesn’t fit. We can change the width of the column by pointing to the vertical line between the headers for columns A and B. When the pointer changes to a left and right arrow, press and hold the left mouse button, and move (drag) the mouse to the right. Release the mouse button, and the width of column A will change. You can also right click on the column A header, then left click on “Column Width,” and type in a number from 0 to 255.
If you are up to it, try to complete this takeoff sheet on your own. If not, we will do more work on it next month.
About The Author

CARR has been in the electrical construction business since 1971. He started Carr Consulting Services—which provides electrical estimating and educational services—in 1994. Contact him at 805.523.1575 or [email protected], and read his blog at electricalestimator.wordpress.com.